giovedì 23 marzo 2017

Web host access via domain name only on apache2 and nginx

Introduction


If you have set up a website on a VPS you may want the users to access your website via domain name only.
Let's say your domain name is example.com and the IP address of your server is 123.123.123.123.
You may want the user to be able to see your website by typing example.com on the URL bar of the browser, but not to do that by typing your IP address.
If you just install apache on your machine and add your website content, infact, someone could see your website by generically requring an HTTP connection to your server.
This can be avoided by setting up some virtual hosting configuration.

Why should you want that?


Here's a few reasons:
  1. Because you don't want people to know. Maybe you used your VPS for other services not related to your website, and so you don't want people to snoop on your website by only knowing your IP address or another domain name associated with it.
  2. Because it's not elegant. Honestly, it's not really good looking to browse a website with an IP address on the URL bar :\ .
  3. Because it's more correct. Domain names and IPs don't have a 1-1 relationship. A web server may have many different domain names because a web host is different from a web server. The two entities are on a different abstraction level.
    When you want people to come and visit your website you want them to access the website associated with the domain name example.com. So you want them to get in contact with the host, and not with the whole server.

How to - apache2


For doing that you have to edit the configuration file
/etc/apache2/sites-enabled/000-default.conf
Paste this portion of text at the beginning

<VirtualHost *:80>
    ServerName 123.123.123.123
    DocumentRoot /var/www/foo
</VirtualHost>

The resulting file should look something like this

<VirtualHost *:80>
    ServerName 123.123.123.123
    DocumentRoot /var/www/default
</VirtualHost>
<VirtualHost *:80>
    ServerName exemple.com
    DocumentRoot /var/www/exemple.com
</VirtualHost>

Remember to restart apache2 by typing sudo service apache2 restart.

By doing so when a browser requires a document to your web server to the host 123.123.123.123 or another domain pointing to your VPS's IP address it will get the content from the directory /var/www/foo.
You can place there a placeholder or a different website content as you prefer.
If the HTTP request received by your server is sent to a host that is not specified in any other VirtualHost declaration apache will choose this virtual host because it's the first of the list.
Instead, if the HTTP request specifies the host exemple.com apache2 will use the content of /var/www/exemple.com

You may want instead to redirect the user who connects without providing the domain name to your website.
In that case add this text at the beginning of /etc/apache2/sites-enabled/000-default.conf instead of just providing a different website content.

<VirtualHost *:80>
    ServerName 123.123.123.123
    Redirect permanent / http://www.foo.com/
</VirtualHost>

And restart apache as before.
In this case in a situation as the one mentioned before the user will be redirected to http://www.foo.com.

How to - nginx


If you use nginx and you want to return a different content for those who don't provide the domain name you have to edit the configuration file /etc/nginx/sites-available/default and paste this portion of text at the beginning

server {
        listen 80 default_server;
        listen [::]:80 default_server;

        root /var/www/default;
        index index.html index.htm;
}

And restart nginx by typing sudo service nginx restart

So if your VPS receives a HTTP connection with a host name that is not spcified in any other server tag of the configuration file, nginx will give back the content of the directory /var/www/default
martedì 15 marzo 2016

Completely automatic Tp-Link TL-WN725N driver update for Raspberry Pi2!

[ EDIT IMPORTANT!! 04/07/17 ]
Since a few drivers version this script is not working anymore due to different database handling for drivers name. I'm not sure I'm going to update this script due to lack of time. Maybe in the future but It's not warrantied.

Introduction


Finally, I made an easily installable and ready to use version of my scripts for updating the Tp-Link TL-WN725N driver for Raspberry Pi2


How to


First, if you want this porogram to run, you need lynx, if you have not lynx alredy, then download it by typing
1
sudo apt-get install lynx

Just download, unpack and install. Open your system console and type
1
 

2
3
wget https://www.dropbox.com/s/el0dyp8j0geliz4/self_installing_tp-link_drivers.tar
tar -xvf self_installing_tp-link_drivers.tar 
sudo bash install_tp-link-wifi.sh 


Usage


You can now type the command
1
tp-link-wifi download
To download the most recent and the current driver on a backup cache.

And the command
1
tp-link-wifi install
To install the driver of the current version (works offline).

You should use the "tp-link-wifi download" command after an update and before rebooting, so that you have the drivers in the backup cache when you will reboot and you will not have a connection anymore.
You can then install the driver offline with "tp-link-wifi install". It often works even when you forgot to use the "tp-link-wifi download" command because sometimes you will alredy have the driver you need in the backup cache (the required driver for a new OS version can be an elder one or the same as before), and so that driver will be installed.

domenica 13 marzo 2016

Port Forwarding Netgear Router without "Port Forwarding/Port Triggering" tab

A Netgear router configuration web interface usually has an apposite tab for the port forwarding. Depending on the interface you should easily forward a port going to Advanced Setup > Port Forwarding/Port Triggering. You can check a guide here or here.

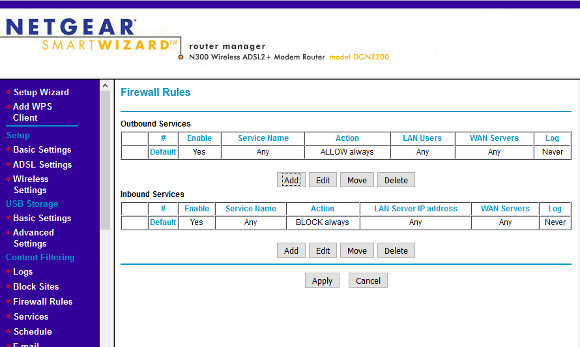
It is possible anyway that the web interface does't present that tab. In that case you should go to Content Filtering > Firewall Rules.


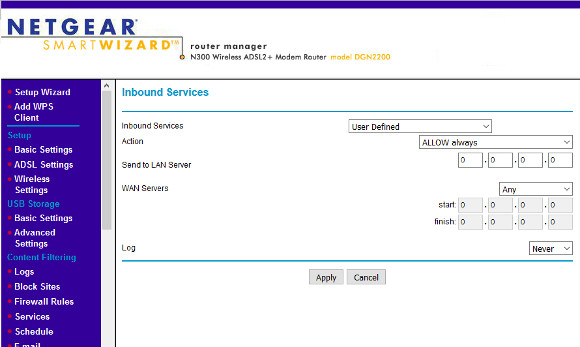
Click on Add under Inbound Services.


Now you can select the server to forward to on Send to LAN Server and the service in Inbound Services. If you need to add a non-default service you can add one on Content Filtering > Services.

TL-WN725N WiFi adapter driver auto update scripts for Raspberry Pi2

(Edit)
If you are looking for an auto-update or auto-install program (and not only the libraries) click here.

Introduction


Differently from Raspberry Pi3, the Raspberry Pi2 has not a WiFi module, and so it is necessary to buy a usb WiFi adapter.

If you don't want to buy the official Raspberry Pi WiFi dongle, you can find many cheaper ones, like the Tp-Link TL-WN725N.

In this case you will need to install a specific driver, and you will need to update the driver each time you update your operating system.


How to update the driver manually


If you are looking for a guide about how to manually install the driver you can find it here, and you can find a complete list of the drivers here.


Auto update


Updating the driver manually each time you update your Raspberry Pi2 can be really annoying, in particular if you don't want to connect it with a LAN cable each time you have to update the OS.

Fortunately I made a few simple scripts which should do the trick.

You can download the ".tar" archive here.
Or you can download by command:
wget https://www.dropbox.com/s/hbnq9u3peto6v1j/update_drivers_for_TL-WN725N_wifi_dongle.tar


Instructions


First download and unpack the package by typing the following:
wget https://www.dropbox.com/s/hbnq9u3peto6v1j/update_drivers_for_TL-WN725N_wifi_dongle.tar
tar -xvf update_drivers_for_TL-WN725N_wifi_dongle.tar

You can now rename the unpacked "update_drivers_for_TL-WN725N_wifi_dongle" directory or move it wherever you want.
After that you have to move into the directory and change a parameter in the "settings.config" file.
nano settings.config
And change the parameter
root_directory=/home/pi/scripts/update_drivers_for_TL-WN725N_wifi_dongle
to
root_directory=path_of_the_directory

Now you can run the scripts contained in the directory by typing
sudo batch name_of_the_script.sh

There are two main scripts.

The first is "download.sh" which downloads the drivers on the device, which should be run after an update and before rebooting.

The second is "install.sh" which installs the alredy downloaded driver corresponding to the current operating system version.

Read the "README.txt" file or the description of the scripts for more details.

Keep me updated about issues you may find and leave a feedback! Check out this page for future updates!